 Claw
ClawHow to Install ClawMetry on Your Self-Hosted OpenClaw (VPS, Raspberry Pi, Mac)
Running OpenClaw on your own hardware? Whether it's a Hetzner VPS, a Raspberry Pi under your desk, a Mac mini in your closet, or a Linux desktop, you have two ways to install ClawMetry. Pick whichever fits your workflow.
Total time: about 3 minutes.
Who this is for
You're running OpenClaw on hardware you control. Maybe it's:
- A Hetzner VPS (or DigitalOcean, Linode, Vultr, etc.)
- A Raspberry Pi running 24/7 at home
- A Mac mini tucked away as a home server
- A Linux desktop or workstation
You have full control over the machine. You can SSH in. You can install packages. You own the whole stack. But you still need visibility into what your agent is actually doing.
The problem
Your self-hosted OpenClaw agent runs 24/7. It processes messages, spawns sub-agents, runs cron jobs, calls tools, burns tokens. And unless you're tailing logs manually, you have zero visibility into any of it.
- How many tokens did it use today?
- Which model is costing you the most?
- Is that cron job actually running?
- Did the sub-agent it spawned succeed or fail silently?
- What was it doing at 3 AM when you were asleep?
Self-hosting gives you control. But control without visibility is just extra responsibility with no feedback loop.
Option A: The curl one-liner (SSH into your host)
If you have SSH access to your machine, this is the fastest path. Open a terminal and run:
pip install clawmetry && clawmetry connectThe clawmetry connect command will ask for your email to authenticate. It sets up E2E encryption between your instance and ClawMetry Cloud.
Then set up supervisord to keep the sync daemon running across reboots:
# Create a supervisord config for ClawMetry
cat > /etc/supervisor/conf.d/clawmetry.conf << 'EOF'
[program:clawmetry-sync]
command=clawmetry sync
autostart=true
autorestart=true
stderr_logfile=/var/log/clawmetry-sync.err.log
stdout_logfile=/var/log/clawmetry-sync.out.log
EOF

# Reload supervisord
supervisorctl reread
supervisorctl update
supervisorctl start clawmetry-sync
Done. ClawMetry is installed, connected, and will survive reboots.
Raspberry Pi note: ClawMetry works on ARM64. If you're running a Pi 4 or Pi 5 with a 64-bit OS, pip install clawmetry works out of the box. For older 32-bit Pis, make sure you're running Python 3.9+.
Mac note: On macOS, use brew install supervisor if you don't have supervisord, or use launchd to keep the sync daemon running. The pip install and connect steps are identical.
Option B: The agent command (via Telegram or Discord)
Don't want to SSH in? Just tell your agent to do it. Open your agent chat and paste this:
Help me install in a long running PTY pip install clawmetry && clawmetry setup && setup clawmetry sync via supervisord
Your agent will install ClawMetry, handle the interactive authentication prompts, and set up supervisord. All from a chat message.
Why "long running PTY"? The clawmetry setup step needs interactive input (it asks for your email to authenticate). Running in a PTY ensures the agent can handle the interactive prompts.
This approach is especially useful when your OpenClaw host is remote (a VPS you rarely SSH into) or when you just prefer talking to your agent over typing terminal commands.
What happens
Regardless of which option you chose, the same three things happen:
- Install ClawMetry via pip. Takes a few seconds.
- Connect to ClawMetry Cloud using
clawmetry connect. This authenticates your instance with end-to-end encryption. Your data stays yours. - Set up supervisord to keep the sync daemon running. Even if your machine reboots, the ClawMetry sync process comes back automatically.
E2E encrypted. The connection between your self-hosted instance and ClawMetry Cloud is end-to-end encrypted. We can't read your session data, memory files, or tool calls. Only you can. This is especially important for self-hosters who chose to run their own hardware precisely because they care about data ownership.
What you get
Once connected, open app.clawmetry.com. You'll see your agent's activity in real time:
- Agent sessions with full tool call traces and thinking
- Token costs broken down by model, session, and tool
- Memory changes to SOUL.md, MEMORY.md, and other workspace files
- Cron jobs with status, schedule, and failure history
- Sub-agents with real-time progress, commands, and outcomes
- Session history with timeline and cost breakdown
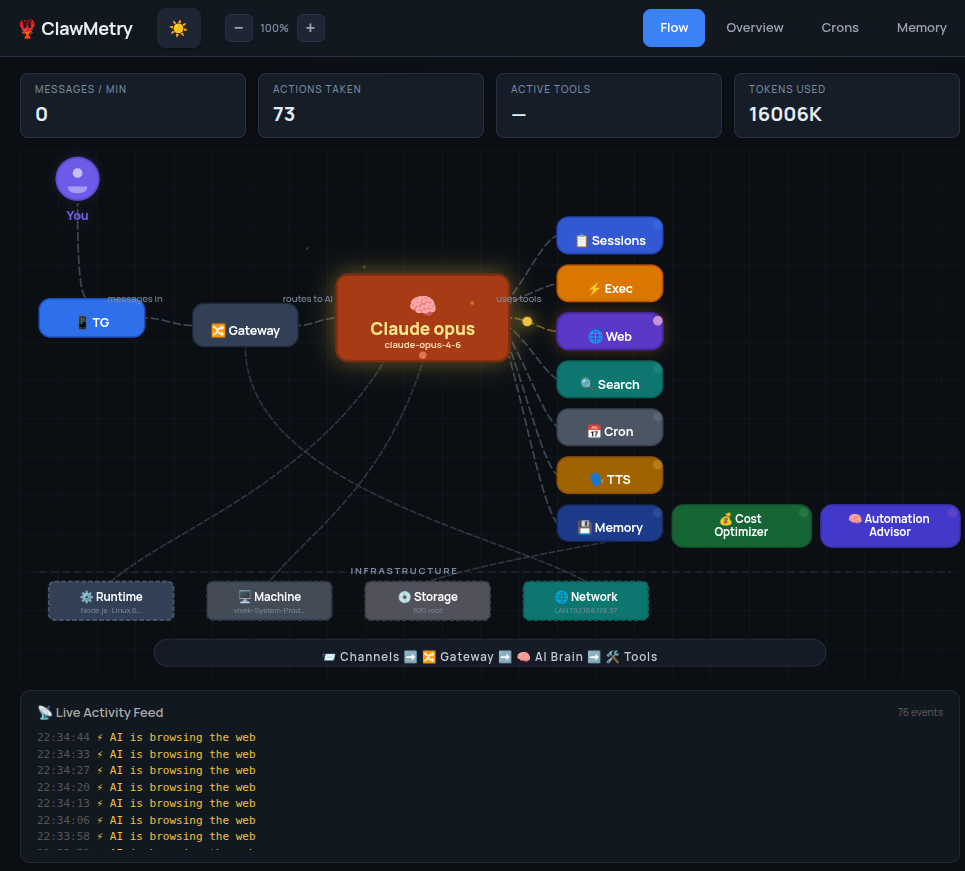
You go from tailing log files and guessing to having a clean dashboard that shows everything your agent does, in real time, from any device.
Hardware-specific tips
Hetzner / Cloud VPS
The most common self-hosted setup. SSH in, run the one-liner, done. If you're using systemd instead of supervisord, create a clawmetry-sync.service unit file instead. ClawMetry is lightweight and won't compete with your agent for resources.
Raspberry Pi
ClawMetry runs great on Pi 4 and Pi 5. The sync daemon uses minimal CPU and memory. Make sure you're on a 64-bit OS (Raspberry Pi OS Lite 64-bit is recommended). If your Pi is headless, the agent command approach (Option B) is perfect since you're probably already talking to it via Telegram.
Mac mini / macOS
Works out of the box with Python 3.9+. For persistence, use either brew services with a supervisord formula or create a native launchd plist. If you're running OpenClaw as a background service via launchctl, ClawMetry's supervisord config fits right alongside it.
Linux desktop
Same as VPS. If you're not using supervisord, a systemd user service works too. Run loginctl enable-linger $USER so it survives logouts.
Video walkthrough: Want a visual guide? Check out our YouTube setup video that walks through the entire process on a fresh Hetzner VPS.
That's it
Self-hosting means you own the stack. ClawMetry means you can actually see what's happening in it. Two installation options, one outcome: full observability into your self-hosted OpenClaw agent.
Pick the approach that fits your workflow. Either way, you're up and running in under 3 minutes.
More setup guides
See what your self-hosted agent is doing
Free, open source, E2E encrypted. Works on any hardware.
Get ClawMetry